
Translation System Guide
First off, thank you! If you’re reading this then that likely means you’re interested in helping bring PULSAR: Lost Colony to more players, and that really means a lot to us. We hope you find this guide helpful in your efforts, and we wish you the best of luck when it comes to the task of translating the game.
To begin, make sure that you are logged into your Steam account. Run PULSAR: Lost Colony. In the main menu, click on Options -> Game -> Change Language.
In this menu, you will see all of the translations you can access from the Steam Workshop. You can click install on any translations you wish, which will subscribe you to that translation’s Steam Workshop project. Activate the translation you wish to play with. Deactivating will revert the game to its original English setting.
If you want to start your own translation, click “Add” and then name your translation.
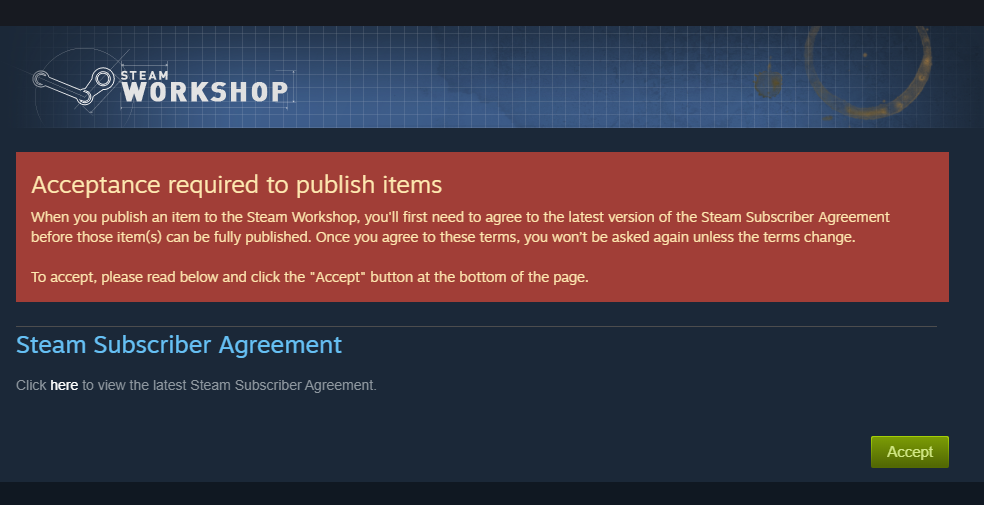
If this is your first time using the Steam Workshop, you will need to agree to the Steam Workshop Agreement. A window will open via the Steam overlay. In the orange box that says “Action required”, click on the Steam Workshop Agreement link. Click the next link taking you to the agreement and read through it. If you agree to the terms, click the green “Accept” button and Shift-Tab back to the game.
Once you have created a new translation, click edit to open the information menu. Here you’ll be able to rename, describe, and upload an image representing your translation. This window also shows you the content path on where the actual translated files are located on your computer.
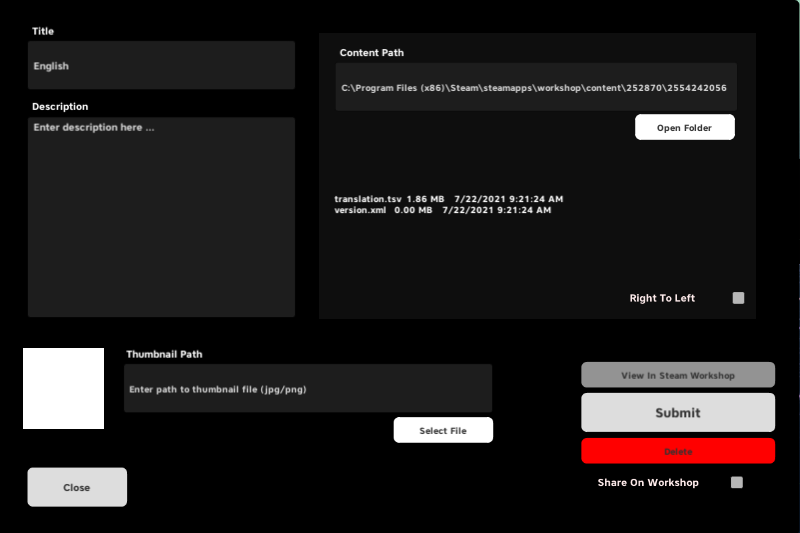
If you’re on a PC, you’ll be able to open the folder containing the games’ text by clicking the open folder button. Otherwise you’ll need to find the file location by referencing the content path on this page.

Now that you have the files, you can begin the process of translating the game’s text into another language!
We provide instructions below on how to properly import and export the data file so the game can read it properly.
Important Note: If you decide not to use one of the programs listed below, keep in mind that the data file needs to be encoded in “Unicode (UTF-8)” and the file needs to be formatted as tab separated values. Some programs may export the file correctly but as a .csv file. If this is the case, rename the extension with .tsv
Important Characters: When translating text you’ll see characters like ^ $ and other code-like structures. It’s important to try and keep the context of those characters when translating because they will end up being special characters and line breaks.
Special replacement characters:
| gets replaced with (tab)
$ gets replaced with (new line)
@ gets replaced with (line break)
^ gets replaced with (double quote character)
In Google Sheets
Importing the File:
Find the translation.tsv in the location described by the content path.
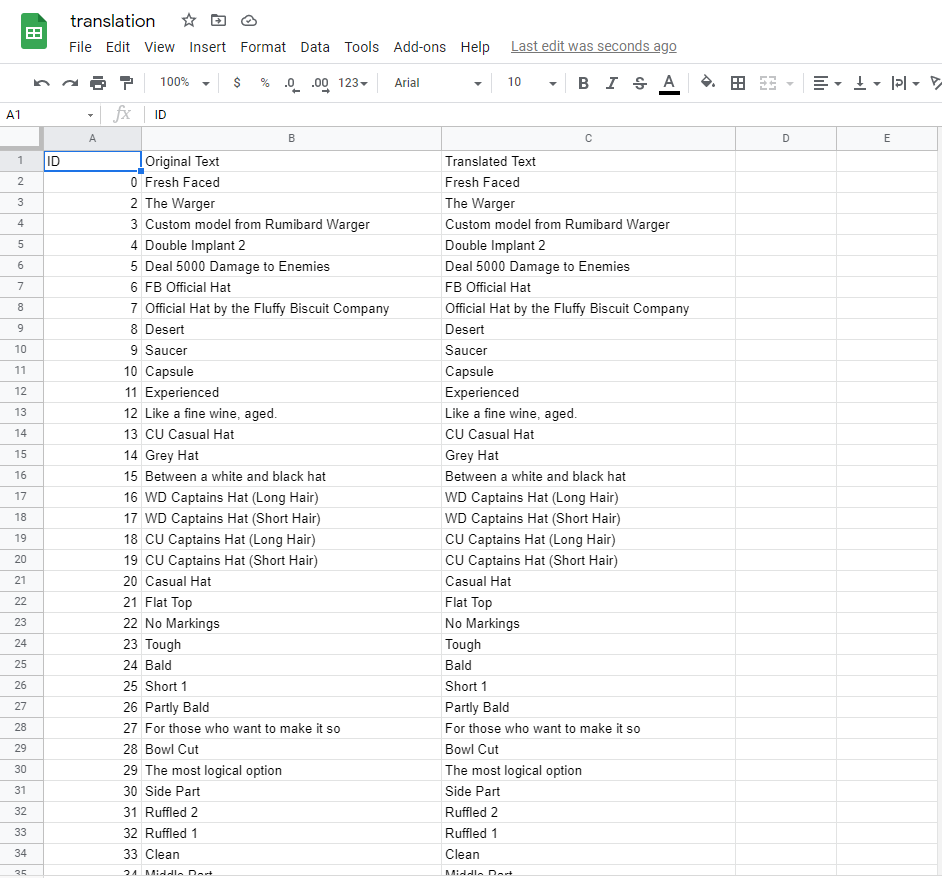
In GoogleSheets click on File -> Open -> the upload tab -> drag in or select the translation.tsv file.
It should load three columns of data, the ID , the original text, and the translated text.
You can begin translating the text in the third column.
Exporting the File:
When you are ready to bring the file back into the game (for testing what you currently have or to upload/update it on the Steam Workshop) you can go to file -> download -> tab separated values (.tsv, current sheet) This will download the file.
Remember to rename the downloaded file to translations.tsv
Replace the file with the old one in the correct folder. Restart the game. If you don’t see the language you may need to activate it by going to the languages window, finding the language you’ve been working on and clicking “Activate”.
Tips:
- As Google Sheets is an online platform you can invite others to help edit the document!
- By pressing Ctrl-A and going to Format > Text Wrapping > Wrap the larger strings of text will be displayed fully.
- Google Sheets can perform AI translations to a number of languages in a specific column of cells. While we wouldn’t recommend just submitting that as a finished translation, it may be helpful in reducing the workload.
- While Google Sheets has a lot of version control capabilities built in, we always recommend taking backups of your work when possible.
In Microsoft Excel
To Import/Edit Translations:
Open Excel and create a new blank workbook
From the upper menu select ‘Data’ then ‘From Text/CSV’

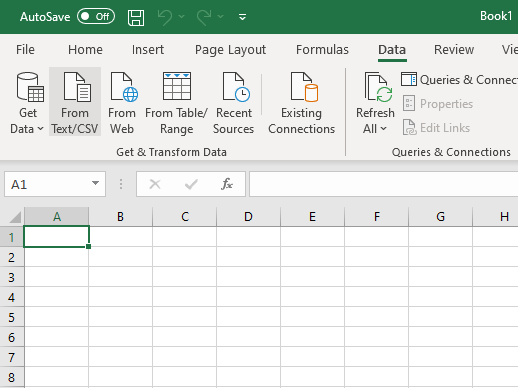
Change the file type from ‘Text Files’ to ‘All Files’

Select the translation.tsv file in your content folder (reference the Edit Language menu for the content root folder) and click Import
In the File Origin dropdown change setting to ‘65001: Unicode (UTF-8)’
Leave delimiter as Tab
Click ‘Load’ in the bottom right of the window
It should load three columns of data, the ID , the original text, and the translated text.
You can begin translating the text in the third column.
To Export:
Click File then Export
Select ‘Text (Tab delimited) (*.txt)’
Save the file and change the file extension to tsv
Replace the translation.tsv file in your language’s content root folder
Restart the game to fully see the changes
Submit the changes via the Edit Language window to the Steam Workshop
In OpenOffice
To Import/Edit Translations:
Create a new document in OpenOffice Calc
Drag the translation.tsv file from the content root folder (reference the Edit Language menu for the content root folder) onto the new sheet
Change the character set to Unicode (UTF-8)
Click OK
Optionally change column B width to 8’’
It should load three columns of data, the ID , the original text, and the translated text.
You can begin translating the text in the third column.

To Export:
Click File then Save As
Deselect Automatic file name extension
Change filename to translation.tsv
Save file to the content root folder for your language
Restart the game to fully see the changes
Submit the changes via the Edit Language window to the Steam Workshop
General Translation Process
After opening the file, you’ll see three columns. The first defines the line’s ID which is how the game reads the data. These numbers could be useful as a reference, but it’s important not to change these numbers otherwise this could break the translation.
The second column is the original game text. This is the English version of the text as originally written. This column should also not be changed since it acts as a reference for your translations.
The third column is where the newly translated text can be input. By default there will be a copy of the English text in each cell, but this will need to be overwritten with the translated text. This is what the game will read when displaying the new text.
Having the English text present may be useful for translators who wish to start with an AI translated base which can be possible in Google Sheets. It can also be useful for partial translations where the English text continues to serve as placeholder text.
Important note: Do not add any extra information to any of the cells in other columns. This may break the formatting of the translation.
When you’re ready to upload your translation, replace the file in the folder. Doing this will allow you to test the language ingame. A good test to make sure the data is formatted correctly is looking at the main menu. If words appear out of order, then there was likely an issue with the text formatting. We recommend going back to the instructions for the program you were using and making sure you correctly followed the import and export steps.
Once you’re happy with the translation you can go back to the “Change Language” menu and click “Edit” on your translation. Then click the submit button to upload your changes to the Steam Workshop.
Adding a thumbnail:
You may want to add an image representing your translation. In order to do this you must be running PULSAR: Lost Colony. First, go to the “Change Language” menu and click “Edit” on your translation.

If you’re on a PC you should be able to click on the “Select File” button under the thumbnail path. Otherwise you’ll need to manually find the path to the image and copy it into this field. The game will then upload the image. You will need to submit your translation in order to see or update the thumbnail. It may take a few minutes for the thumbnail to update after submitting so don’t be alarmed if you don’t see it in the preview window.
Note: While you can add other images and descriptions through the Steam Workshop interface, you can only upload and update the thumbnail image through this method.
Updating a translation:
As more content is added and the final strings of text are opened up for translation, the language version number will change. You’ll be made aware of this via the “In-Place Language Update: button in the Edit Language Menu.
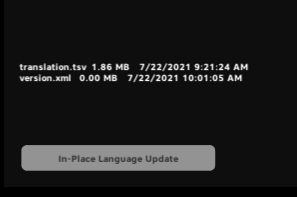
This button will add additional cells of text to the bottom of the file while keeping your relevant translations. This will hopefully allow you to continue work without breaking any previously existing work.
Deleting a translation:
By deleting a translation, it no longer becomes available for others to see and install. Those who do currently have it installed will no longer have access to it after they reboot the game.
Clicking the red delete button will perform this action, and after confirming the action the file will be deleted.
Translation Support:
If you encounter severe issues regarding your translated text interfacing with the game (i.e. too much text for a small area creating clipping or overlapping); if your language isn’t fully supported with the tools provided; if you have issues with editing or uploading the translation; or if you spot areas of untranslated text in the game, feel free to let us know by emailing: team@leafygames.com
We also have a dedicated section of the forum for translation support. Link to forum
Special Note:
The Depths of Umbra-K54 campaign has specially formatted text for the logs players can find.
Text will be obscured and revealed based on the ship's translator level. Behind the scenes, this is indicated by the tags <1></1>, <2></2>, <3></3>. Text without a tag will be revealed immediately upon collecting the log. Level 1 text will be revealed after collecting several logs, level 2 after several more logs, and level 3 when nearly all the logs have been collected. In the original text, these levels were formatted for English, but (ironically) this may not make sense for other languages. Please feel free to take whatever liberties might be necessary for the text's obfuscation.
A couple notes of possible importance: any references to heat or cold should probably have a higher obfuscation level. Additionally, we tried to avoid references to time.