
THE ENGINEER
"The reactor is the beating heart of every ship, the life-force all other systems depend on. A good engineer always listens to his ship and knows when to push her to new extremes. Be bold.” Mauxses Weldon - Assistant Director of Applied Research, W.D. Corp.
The Engineer’s job is to maximize the potential power output for each of the 4 conduits connected to the reactor. The task becomes difficult when total reactor output is smaller than all the conduits combined. The reactor temperature can overheat the ship, disabling it for a short time. The Engineer is also the first responder to damaged systems and should always be equipped with a repair tool and extinguisher.
The reactor does not blindly expend energy for no purpose. Because of this, the Engineer does not “send” power to the system. Instead they “limit” the amount of power each system can use. The Engineer does this at the reactor screen.
THE REACTOR SCREEN

This screen is composed of a temperature gauge, a stability rating, a button for overclocking, and 5 horizontal bars that fill from left-to-right. The size of the bars depends on how powerful the currently installed ship components are. The most powerful of the 4 conduits will have the largest bar, and the rest will scale proportionally to that specific conduit. This gives the Engineer a quick understanding of how much power every ship system may require.
The four conduits are the top bars in the following order: Engineering, Science, Shields, and Weapons. The bottom bar reflects the total usage of the installed reactor. Simply put, the length of the bottom bar is the total amount of energy the entire ship can use. Each of the four conduits will attempt to take a piece of that bar for their own systems.
The bars fill with blue based on how much power is being allocated. The Engineer can select the limit of how much power each conduit can use by clicking and dragging in the bar to move the white triangle above it. The white triangle indicates the power limit of each component. Setting limits scales the efficiency of any system connected to that specific conduit. Setting the limit to the bare minimum will effectively disable any systems that are connected to that component.
Each of the 4 conduits is connected to a number of other ship systems:
Engineering: Controls the amount of power that can be sent to the thrusters and warp drive. Limiting this component will reduce the amount of thrust the ship can produce, and increase the time it takes to charge the warp drive.
Science: Controls the amount of usable power for the sensors and scanners. Limiting this component will reduce the ship’s tactical sensor range, potentially allowing discovered ships to disappear from your readings. It will also decrease the effectiveness of any active scans, as well as increase the amount of time it takes to perform one. Atrium regeneration and warp drive calculation will also be slowed.
Shields: Controls the amount of power the shield generator can utilize to regenerate any damage to the shields. Limiting this will slow the shield regeneration process.
Weapons: Controls the amount of power the weapons systems can use. Limiting this will slow the recharge and reload rate of any ship turrets.
The arrow button next to the reactor heat bar represents overclocking. Overclocking increases the output of your reactor at the risk of accumulating heat very quickly. The effects of overclocking are most noticeable when you need to supply power to a lot of ship systems at once. It is recommended to use coolant with overclocking to manage heat. See “Core Safety and Meltdown” below for more information on the stability rating.
THE AUXILIARY REACTOR SCREEN

Found in the engineering room and the bridge, this screen’s purpose is to expose the functions and settings of all the auxiliary systems aboard the vessel. These systems are not connected to the main reactor and its temperature.
By default, these settings will be ON. Leaving them on will ensure all of the auxiliary systems remain functional. Turning systems OFF will give the auxiliary reactor a surplus of power. This will automatically be routed to the main reactor and act as a boost in power.
Aux Reactor Settings:
Atrium Healing: Slowly heals crewmembers standing within the regeneration atrium
Oxygen Gen: Powers the ship’s life support system
Air Filter: Controls a filtering system that removes any toxic gases that have filled the ship
Lights: Controls the ship’s interior lights
Proj. Aim Assist: Enables UI indicators that can help players aim turrets
Cyberdefense: Uses any installed cyberdefense processors to prevent viruses from entering the ship’s computer system
Intruder Alarm: Notifies players of any intruders that have teleported onto the ship
Missile Lock On: Drastically increases missile lock-on speed when turned on
THE WARP DRIVE SCREEN
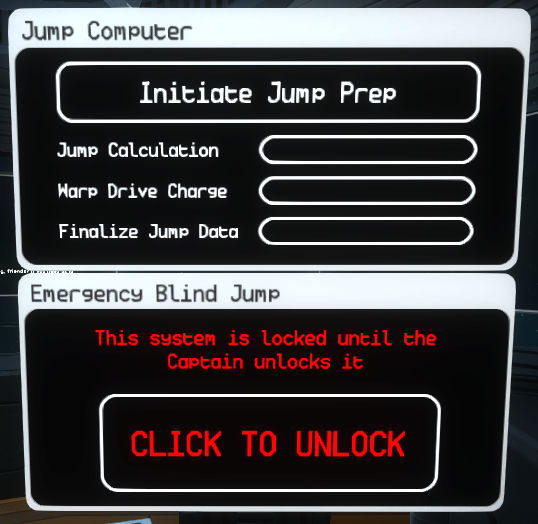
Commonly found at the engineering station on the bridge, the warp drive screen manages the task of preparing the ship for a warp jump. You can start or pause the process at any time. When the warp drive is fully charged and the Pilot has aligned the ship to a sector, the screen will prompt you to engage the drive and jump.
The warp drive screen will also inform you of which sector you will be jumping to. If the ship is not aligned to a sector, the screen will notify you.
Keep in mind, charging the warp drive can cause a noticeable spike in your ship’s EM signature. If there are enemies nearby, they may be alerted of your presence and attempt to intervene.
Under dire circumstances, the Captain can perform a “Blind Jump”. During a blind jump, the warp drive dangerously enters warp without proper calculation or charging. This leads to unpredictable and perilous outcomes. Performing a Blind Jump is incredibly risky, with results that can range from the following: warping to a sector within the ship’s warp-range, warping to a random sector anywhere in the galaxy, ending up too close to a star, or being destroyed immediately. It is not normally recommended unless every other option has been exhausted.
THE COOLANT SCREEN
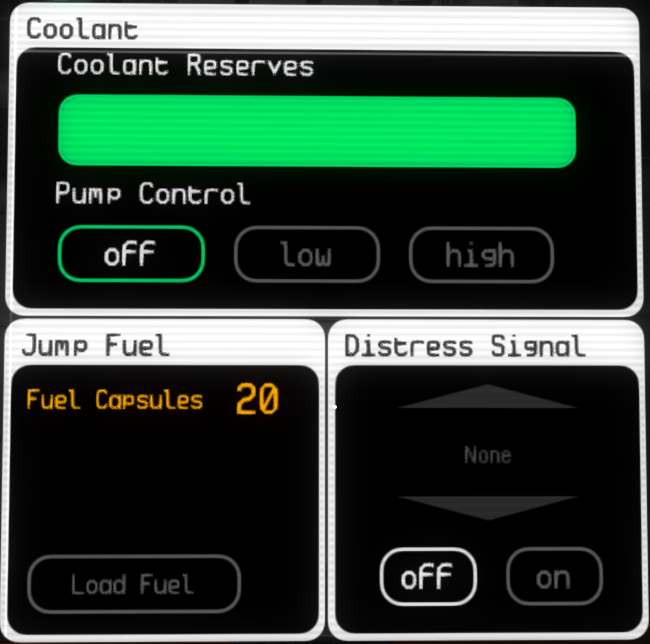
In addition to controlling the ship’s coolant reserves, this screen also displays and manages the ship’s jump fuel, as well as distress signals.
Coolant lowers or slows the rise of reactor temperature without having to reduce any output. The controls are fairly straightforward:
Off: The pumps are off, and no coolant is being used.
Low: A small but steady stream of coolant is entering the reactor. Temperature should be slightly slowed or even decreasing. The coolant reserves will be depleting slowly.
High: A large stream of coolant is entering the reactor. Temperature should be drastically slowed or decreasing. The coolant reserves will be depleting quickly.
You can buy more coolant at a trading station. When the coolant reserves have been depleted, the reactor will no longer be cooled even if the pump control is on.
The Jump Fuel window refers to the number of fuel capsules onboard the ship. A fuel capsule is required for a ship to jump to a new sector. After jumping to a new sector, a fuel capsule will automatically be expended. Any programs that are in the charge slots will also be charged during warp, and any active research projects will be moved forward one step.

Alternatively, if programs need to be recharged or research needs to be completed with haste, the Engineer can press the “Load Fuel” button to load a fuel capsule into the “Manual Program Charging Station” usually located in the engineering room of the ship. Once a capsule is ready and the lever is pulled, the programs will charge without the ship having to jump to a new sector.
Expending fuel capsules for jumps and manual program charging may exhaust all fuel capsules, which can cause your ship to become stranded in a sector. An observant Engineer should notice the small supply of fuel and advise the Captain to buy more at the next trading station. However, if there comes a time when your crew is stranded in a sector, you may have no choice but to broadcast a distress signal to nearby sectors.
The Distress Signal window is used primarily when a crew is unable to perform a warp jump. There are a number of different signals that can be used. Many of these signals have security features which help send specific messages or alert specific people. Flip between the various signals installed on the ship by clicking the up and down arrows. Activate a signal by pressing the ON button. To switch signals, you will first need to turn the active one OFF.
General Distress Signal: By far the most basic signal. Every ship is equipped with a general distress signal. When used, almost anything may show up. It has no security features and anything with long-range scanners can detect it. It is mostly used by civilians, but pirates have been known to head towards general distress signals due to the easy plunder.
Union Distress Signal: Specially designed for officers in the Colonial Union. Union officers may use this signal to alert fellow officers of an emergency.
WD Distress Signal: A secure signal created by the Wolden-Dorf Corporation. Alerts any WD vessels nearby to the emergency.
CORE SAFETY AND MELTDOWN

When the ship’s reactor reaches a critical temperature, an automatic safety system turns the entire ship off momentarily and rapidly cools the core. While the ship is off, you are vulnerable to enemy attacks. The Engineer may choose to disable this system at the Core Safety Toggle station. After the lever is pulled, the green light will turn red and the ship will no longer deactivate itself when reaching critical heat.
By doing this, the Engineer can effectively push the ship farther than its designed limits and keep it running for a bit longer. The reactor can only stay in critical heat for a short amount of time. Eventually, the heat will begin to deteriorate the integrity of the core, causing it to become unstable and meltdown. This is represented by the stability rating to the left of the temperature gauge on the reactor screen. When the stability percentage reaches zero, the core will overload and must be ejected or else it will explode and destroy the ship.


A core meltdown is a very dangerous event. The crew must act fast in order to save the ship. When a meltdown sequence initiates, the reactor screen will no longer function normally. It will display a meltdown timer approximating the moment of the core implosion. Attached to every reactor is a core eject lever. Flipping this lever will eject the core through the bottom of the ship. The core is still volatile and will explode, which may harm the ship if it doesn’t move away swiftly enough.
Once the core is ejected, the reactor is dead. It no longer exists in the ship components and there is no power going to any system. In order to fix this problem and fly as far away from the ejected core as soon as possible, the Engineer will need to use the auxiliary reactor screen to route power to engineering.
When engineering has power, the Pilot must fly away from the core to avoid damage from the core explosion. This is a complex task and must be carried out quickly if the ship and crew have any chance of survival.
SHIP STARTUP SEQUENCE

Every ship is equipped with a Startup Switchboard. This wall mounted device acts as an on/off switch for the entire ship. Turning the ship on requires a six step process, and five of those steps occur at the switchboard. When the ship is offline, all screens and systems are disabled. The only screen still on is the Startup Screen, shown above to the right.
The Startup Screen will prompt the crew on how to start the ship again with the following steps:
1: Pull the first lever (left)
2: Boot the Ship OS on the Startup Screen
3: Pull the second lever (middle)
4: Prime the warp core on the Startup Screen
5: Pull the third lever (right)
6: System is active. Perform a manual override at the main computer screen to allow access to other systems.
The startup sequence will not work unless the steps occur in the correct order. However, the system will prevent you from performing the steps out of order.
Turning off the ship is a much easier task. Pull the first lever and all power will be immediately cut. The shield generator can be disabled by pulling the third lever, which is necessary for getting hull damage repaired at repair depots.
Rebooting the ship is very useful when infected with a virus. Viruses can insert themselves into a ship and cause many harmful effects. Rebooting the ship effectively purges any virus, but takes time to get the ship online again.
There are EMP weapons that can shut down a ship within range of the device. Keep an eye out for these types of weapons.
SHIP SALVAGE

When a ship is abandoned or in a neutral state, its components can be targeted for extraction. The ship salvage system allows players to select specific components from an abandoned ship and attempt to pull them into their own ship’s cargo.
Extraction is risky, however, as it has the potential to destroy the target abandoned ship along with all of its components. Some components, such as reactors, are more difficult to extract without destroying the target ship. A percentage is displayed on the bottom of the extraction screen, illustrating the chance of success for salvaging each component. Multiple extractions can be performed, but if the ship is destroyed during an extraction, it will not drop scrap.
INSTALLED COMPONENT UPGRADER

The Installed Component Upgrader can usually be found near the engineering room of each ship. To use this system, click the arrows to cycle through to the desired component. You can then see the before and after stats of the component, as well as the required amount of processed scrap to perform the upgrade.
The upper-right corner of the screen displays the total amount of processed scrap you have. The lower-left corner displays the required amount of processed scrap needed to perform the upgrade.
When you are ready, click "Upgrade", and that component will immediately be upgraded. Its level will be increased by 1.
Some important things to note about the system:
To upgrade a ship component you must be in a sector with a repair depot.
The maximum level to which you can upgrade a component is 10.
Certain components are inherently better than others, so keep that in mind when deciding to upgrade. For example: a level 3 Adelaide Thruster is still less powerful than a level 1 Racing Thruster.
Certain components (like programs and viruses) cannot be upgraded.
The component upgrader cannot be used to upgrade components stored in cargo. Components must be installed on your ship.
You must have the appropriate talent in order to perform the upgrade.
PROCESSING SCRAP
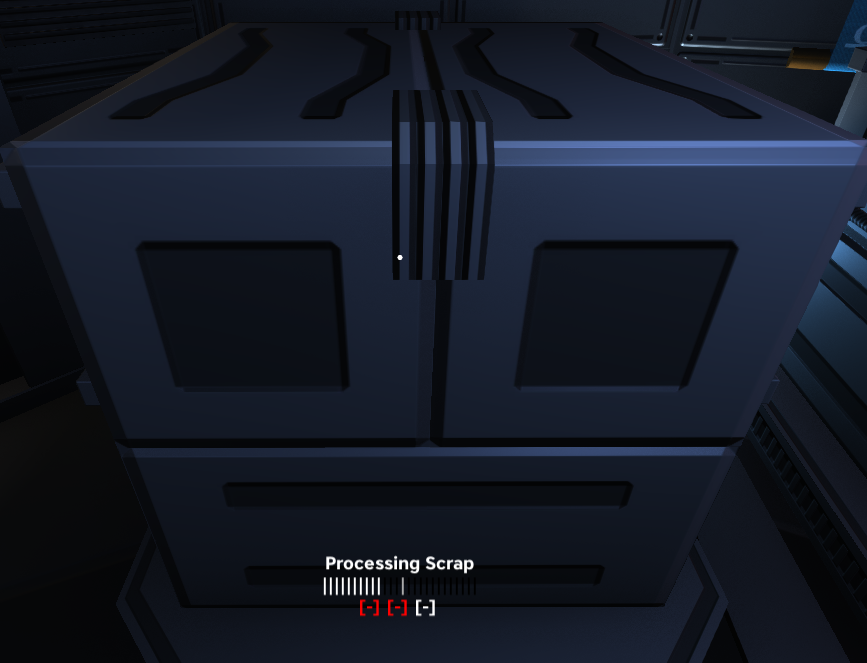
To process scrap you must have a scrap component in the cargo section of your ship. Approach the scrap object in the cargo bay and hold “R” to begin the process. To successfully process the scrap you must release “R” at the right moment when the progress visuals meet with the white line.
When you succeed, one processed scrap will be added to the ship. You can view the total number of processed scrap by looking at the upper-right corner of either of the upgrade stations.
Only crewmembers with the Item and/or Component Upgrader Operator talents may process scrap. The Captain, Weapons Specialist, and Engineer begin with these talents.
Each crewmember can fail to process scrap three times per jump before they are prevented from any more attempts.